

Interior Foam Crown Molding and Decorative Trim – Styles, Design Ideas, Installation, and Benefits
Picture this: you’ve just repainted your living room a warm, deep navy. The walls look sharp. The furniture is arranged exactly how you wanted it. But something feels unfinished – that bare gap between the wall and ceiling looks like a sentence without a period. That’s usually the moment people start thinking seriously about crown moldings. And once they start pricing out wood or plaster options, a lot of them land on the same question: what about foam?
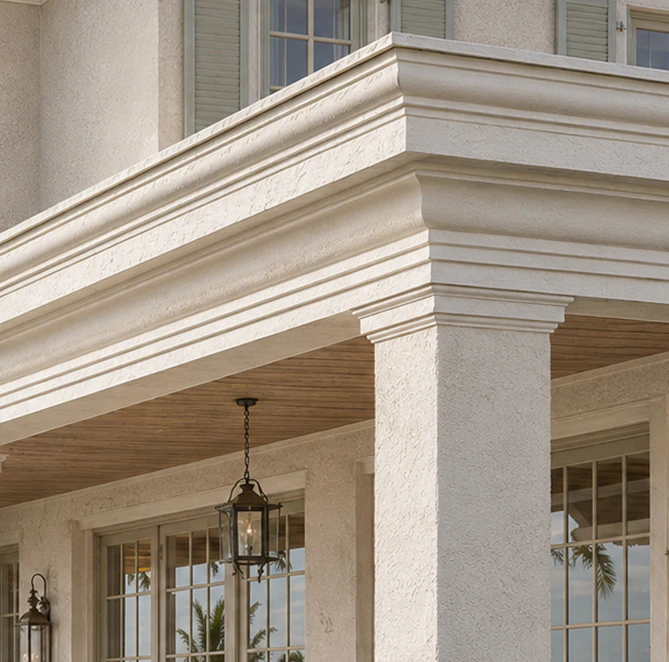
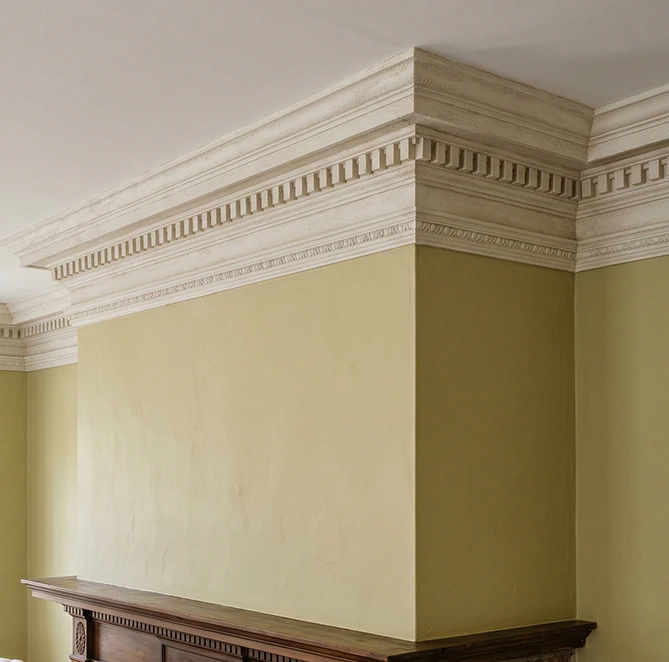
The variety available in foam crown molding today would genuinely surprise most homeowners who haven’t looked recently. This isn’t just simple cove profiles anymore. You’re looking at everything from classic egg-and-dart patterns to clean-lined modern profiles, deep dentil molding, stepped colonial styles, and ornate European-inspired designs that would be almost impossible to replicate in wood without serious craftsmanship and cost.
EPS crown molding – that’s expanded polystyrene – is the most common base material. It holds detail extremely well during manufacturing, which is why foam can reproduce the kind of intricate relief work you’d normally associate with plaster or carved wood. The finished surface is smooth and ready to accept primer and paint, so the visual result once it’s on the wall is virtually indistinguishable from more expensive materials to most people standing in the room.
For modern interiors, the trend is toward flat-profiled foam trim walls with clean geometric lines. A simple stepped cove in a matte white finish reads as contemporary and intentional rather than traditional. Pair that with high ceilings and you get a look that feels architectural without being heavy or ornate. On the other end of the spectrum, if you’re working on a Victorian-era home or a room with traditional furniture, there are foam ceiling molding profiles with enough depth and detail to hold their own visually against the rest of the decor.
Foam baseboard molding deserves its own mention here. A lot of people focus on crown and forget the floor line, but baseboards are equally visible and equally capable of changing how finished a room feels. Taller foam baseboard molding profiles – 4 to 6 inches – give rooms a more substantial, custom-built look. Combined with matching door and window casing in foam interior trim, you can create a fully cohesive architectural package throughout a space without the cost or complexity of wood millwork.
There are also decorative foam molding interior options that go beyond the standard crown-and-base combination. Ceiling medallions, corbels, panel molding, chair rail profiles, and even column wraps are all available in foam. These elements let you add visual structure and period detail to rooms that would otherwise feel plain, and they’re particularly useful in new construction where the architecture itself tends to be minimal.
Color is worth thinking about too. Most foam molding home ships in white, which works well in the majority of interiors. But because it paints so easily, you’re not locked into that. Some designers paint crown molding in the ceiling color to make it recede, or in a contrasting accent color to make it a deliberate feature. Foam handles both approaches without any special preparation beyond a coat of primer.
The way you use foam molding decor really depends on the room, the ceiling height, and what you’re trying to accomplish visually. There’s no universal answer, but there are some patterns that work consistently well.
In living rooms and dining rooms, crown molding does the most visible work. These are the spaces where people spend time and actually notice the details. A 4 to 5 inch foam crown molding profile at a standard 8-foot ceiling looks proportional and finished. Go bigger – 6 to 8 inches – and the room starts to feel more formal and substantial. If you have 9 or 10-foot ceilings, you can push even further without it looking out of scale. The key is matching the profile complexity to the room’s overall style. A heavily detailed dentil molding in a minimalist modern room looks confused. A clean cove profile in a traditional room looks underdressed.
Bedrooms benefit from a lighter touch. A simple foam ceiling molding profile, maybe 3 to 4 inches, adds polish without making the room feel heavy. Some people add panel molding to bedroom walls as well – those rectangular frames you see in more formal rooms. Foam makes this genuinely achievable on a budget. You’re essentially creating the look of wainscoting or raised-panel walls using flat foam trim walls pieces arranged in a grid pattern and painted to match the wall. It’s a significant visual upgrade for a relatively small investment.
Kitchens and bathrooms are where foam molding interior often gets overlooked, but they’re actually strong candidates. Foam doesn’t absorb moisture the way wood does, so it won’t swell, warp, or crack in humid environments. A foam crown molding profile running along the top of kitchen cabinets, between the cabinet tops and the ceiling, fills that awkward gap and makes the whole kitchen feel more built-in. In bathrooms, a simple foam interior trim profile at the ceiling line adds a finished quality that tile alone doesn’t provide.
Hallways and entryways punch above their weight in terms of first impressions. A hallway with foam baseboard molding and a simple crown profile looks noticeably more finished than one without. Because hallways are narrow, you don’t need large profiles – something in the 3-inch range works well and doesn’t make the space feel smaller. Entryways can handle more detail, especially if they have higher ceilings or a staircase. Crown molding that follows the rake of a staircase is a classic detail, and foam handles angled cuts reasonably well with the right tools.
Home offices have become a real focus for people thinking about foam molding modern interior applications. A well-trimmed office with crown molding, panel molding on the lower walls, and clean baseboard profiles looks professional and considered – especially important if you’re on video calls regularly. It’s one of those spaces where the architecture of the room is visible all the time, and foam decorative trim is one of the most cost-effective ways to elevate it.


Installation is genuinely one of foam molding interior‘s strongest selling points. Not because it’s foolproof – there are still things that can go wrong – but because the margin for error is much more forgiving than wood or plaster, and the tools required are minimal.
The basic process starts with measuring the room perimeter and calculating how much material you need. Add about 10 to 15 percent for waste from cuts and mistakes. Foam crown molding typically comes in lengths of 6 to 8 feet, though some manufacturers offer longer runs. Joining pieces mid-wall is normal and, done correctly, nearly invisible once painted.
Surface prep matters more than most installation guides admit. The wall and ceiling surfaces need to be clean, dry, and free of loose paint or texture. If you have heavy knockdown texture or popcorn ceiling, you have two options: scrape and smooth the area where the molding will sit, or accept that adhesion will be less reliable. For most smooth or lightly textured surfaces, a construction adhesive – specifically one rated safe for foam, because some adhesives will chemically dissolve EPS – is all you need. No nails required in most cases, though some installers add a few finish nails for extra security while the adhesive sets.
Cutting the corners is where most people get nervous. Inside and outside corners both require mitered cuts, and getting them right is the difference between a professional-looking result and visible gaps. The good news with foam is that if a cut is slightly off, you can fill the gap with paintable caulk and it disappears completely under paint. Wood doesn’t forgive mistakes that easily. A basic miter saw makes the cuts straightforward. If you don’t own one, a hand miter box works for smaller profiles, though it’s slower.
The actual mounting process goes like this: apply adhesive to the back of the molding piece, press it firmly into position, and hold or tape it in place while the adhesive cures. Most construction adhesives need 24 hours to fully cure, though they grab quickly enough that you can usually move on after 30 to 60 minutes. Once everything is set, caulk all the joints, seams, and the top and bottom edges where the molding meets the ceiling and wall. This step is what separates a finished-looking installation from an amateur one. Don’t skip it.
Painting comes last. Foam takes paint well, but it needs a coat of primer first – either a dedicated foam primer or a standard latex primer. Oil-based primers can cause adhesion issues with some foam products, so check the manufacturer’s recommendation. After priming, two coats of latex paint in whatever finish you prefer will give you a result that looks clean and durable. Satin or semi-gloss tends to hold up better in high-traffic areas and wipes down more easily than flat paint.
The whole installation for a standard bedroom or living room – measuring, cutting, mounting, caulking, priming, and painting – is realistically a weekend project for someone with basic DIY skills. That’s a significant difference from plaster installation, which typically requires a professional and several days of work.
The case for foam molding interior comes down to a few concrete advantages that matter in real-world renovation and construction situations.
Weight is the most immediate one. A 6-foot length of foam crown molding weighs almost nothing compared to the equivalent in wood or plaster. That’s not just a convenience during installation – it means the adhesive bond doesn’t have to work as hard over time, and there’s no risk of heavy sections pulling away from the ceiling years down the line. For anyone working alone on an installation, the weight difference is genuinely significant.
Cost is obvious but worth being specific about. Foam crown molding typically runs 30 to 60 percent less than comparable wood profiles, and the gap widens considerably when you factor in the labor savings from easier installation. Architectural foam interior products that replicate expensive plaster or carved wood details can cost a fraction of the original material while achieving a nearly identical visual result.
Dimensional stability is a real advantage in certain environments. Wood expands and contracts with changes in humidity and temperature. Over time, that movement causes gaps at joints, cracking at paint lines, and sometimes actual warping. Foam doesn’t do this. It stays exactly where you put it, which means the caulk lines and paint finish stay intact longer. In rooms with significant seasonal humidity swings – or in climates where heating and cooling cycles are extreme – this matters.
The moisture resistance mentioned earlier is worth expanding on. EPS crown molding won’t rot, won’t support mold growth the way organic materials can, and won’t deteriorate in the presence of condensation. That makes it a practical choice for bathrooms, laundry rooms, and basements where wood molding would be a poor long-term decision.
Paintability makes foam molding home genuinely versatile in a way that some materials aren’t. You can repaint it as many times as you want without losing detail, strip it back and start over, or change the color entirely when you redecorate. The surface holds paint well and doesn’t require sanding between coats in most cases.
The honest trade-off is impact resistance. Foam dents and gouges more easily than wood if it takes a direct hit – a furniture corner, a door swinging hard, a ladder during a future project. For baseboards especially, this is worth thinking about. In high-traffic areas, a harder material might hold up better over years of contact. Some foam products are denser and more impact-resistant than standard EPS, so it’s worth checking product specs if this is a concern. But for crown molding up near the ceiling where nothing is going to hit it, this limitation is essentially irrelevant.
- What is foam crown molding?
Foam crown molding is a decorative trim profile installed at the junction between walls and ceilings. It’s made from expanded polystyrene or similar foam materials, shaped to replicate the appearance of traditional wood or plaster molding. The finished look is nearly identical to more expensive materials, but the weight, cost, and installation process are significantly more manageable. - Can foam molding be painted?
Yes, and it paints very well. You’ll want to apply a coat of latex primer first – this improves adhesion and gives you a more even finish. After that, standard latex paint in any color works fine, and you can repaint it as many times as you want over the life of the installation without losing any detail in the profile. - Is foam molding durable indoors?
For most interior applications, yes. It resists cracking, doesn’t absorb moisture, and won’t warp or swell with humidity changes the way wood does. The main vulnerability is impact damage – foam can dent if hit hard enough. For crown molding at ceiling height, that’s rarely an issue. For baseboards in busy areas, it’s worth considering a denser foam product or accepting that occasional scuffs may need touching up. - Is it easy to install foam molding?
Easier than wood or plaster, genuinely. The material cuts with standard tools, mounts with construction adhesive, and tolerates minor mistakes that can be fixed with caulk before painting. A typical room installation is achievable in a day for someone comfortable with basic DIY work. The corners require some care with miter cuts, but even imperfect cuts can be corrected with flexible caulk and paint.
Conclusion
Foam molding is one of those home improvement choices that delivers more than its price point suggests. It won’t suit every situation – if you’re restoring a historic home where material authenticity matters, or if you need something that can take serious physical abuse at floor level, there are better options. But for most interior spaces where the goal is a finished, polished look without a major budget or a contractor’s schedule, foam crown molding and decorative trim are hard to argue against. The design options are broad enough to work in traditional and modern rooms alike, the installation is manageable for most homeowners, and the result – once primed and painted – looks exactly like what it’s imitating.
Share the article
More architectural shapes
We provide architects, builders, and homeowners with turnkey decorative elements that transform any project — fast, easy, and cost-effective.






Have a project in mind?
Our dedicated specialists are ready to collaborate with you, turning your concept into a detailed plan with a transparent budget. Let’s bring your vision to life!

& specification catalog
Get the definitive guide to our custom decorative architectural foam shapes. This free catalog is packed with hundreds of design profiles, detailed technical specifications, and real-world project applications.